Followers

Saturday, April 16, 2016

Snow Much Fun.....

Hello everyone: Even though we are having temps in the 70s. for this weekend, I made this card with one of my favorite Snowman stamp sets, the retired SU "Snow Much Fun", super adorable little Snowmen and other images. This card is for the fun and fabulous Merry Monday #200 Multi Challenge Celebration and I used the sketch from Fab Friday #85, here is my card.


I stamped this cute images onto Canson water color paper with Stazon Jet Black ink and colored them with SU markers and the aqua painter, easy and quick. I did a bit of sponging for the sky and stamped the sentiment from Power Poppy Merry Littles using my MISTI to place it on the Snowman's hand.
Here is a picture of the finished inside.


Both the sentiment and the little tree are from the same Power Poppy set, I stamped them inking them up with SU markers.
Here are the banners that inspired my card.

Thank you for stopping by, until next time, happy stamping.
Hugs from Maria.

2011-2012 SU Idea Book and Catalog.


Friday, April 15, 2016

Let's have tea.....


Hello everyone: I'm back with another card for the Power Poppy April Challenge "You Pick 3" and this time, I'm using the sketch from Mojo Monday by Julee Tilman. Here is my card.


The Power Poppy challenge asks to pick 3 markers, at random, or on purpose and use only this 3 colors for our card, I made 3 other cards with this fun challenge, you can check them HEREHERE and HERE if you'd like. For those cards I picked the image first and then the colors but this time around I picked the colors first and, based on what my hands grabbed from the marker box, I picked my image. The color Daffodil Delight was the first marker I grabbed and then, the other two are Tempting Turquoise and Wild Wassabi, but the yellow marker made me think of those adorable little Australian Parakeets that come in all kinds of beautiful colors so, as always when I'm in doubt I Google this birds and found one picture of this sweetie in bright yellow and green, awesome!!
This image is from Power Poppy's Short Stacks and all of the images are absolutely beautiful. Stamped in Canson water color paper with Versafine Onix Black ink and colored with the aqua painters. The pattern paper is from Lili of the Valley and the ribbon from my stash.
Here is a picture of the finished inside of my card.


Both the sentiment and the tea pot and cup are from a retired Flourishes set called "Lets Have Tea".
Here are the banners that inspired my card.


Thank you for stopping by, until next time, happy stamping.
Hugs from Maria.

Retired Flourishes "Lets Have Tea".


Thursday, April 14, 2016

CAS Daisies.....

Hello everyone: This is CAS week at Addicted to Stamps and More so I made this card to participate in this challenge. I still struggle a bit with this style, sometimes I think I'm right on the money and other times I feel like I totally went to far, I don't know about this card but, here it is anyway.


At first I was going to use one whole panel of water color paper but I found this 3 1/2"x2 3/4" piece so I decided to just use it instead. I stamped the image from a retired SU set called "Every Moment", this daisy is just beautiful, I stamped it once with Stazon Jet Black ink and then, made a mask and stamped it again, I colored it with SU Hello Honey ink and the aqua painter, I added some shade with Baked Brown Sugar ink and some Garden Green for the stems.
I tied a little bow with linen thread and stamped the sentiment also with Hello Honey, I scored the panels to frame the image.
Here is a picture of the finished inside of my card.


The greeting is from a retired Flourishes set called "Lots of Thoughts" stamped with Hello Honey, the frame is from another Flourishes set called "Country Charm Labels", stamped (second generation) with Wild Wasabi, the little basket is from Flourishes "Around the Harbor".
Here is the banner that inspired this card.

 
Thank you for stopping by, until next time, happy stamping.
Hugs from Maria.


Wednesday, April 13, 2016

Another take on the Merry Celebration.....

Hello everyone: I had a bit of extra time today and I decided to make another card for the Merry Monday #200 Multi Challenge Celebration, this time I picked the gorgeous pink ornaments for my inspiration, I also want to submit this card to the CASology Pink Challenge, even if my white space is kind of "a little embossed", hope it's ok.


I really like how this card turned out, the ornament is from Memory Box and it's called Snowflake Ornament, I just cut it twice, once in light pink card stock and once in silver foil card stock then, I just put the pink pieces on the silver ornament and the silver pieces on the pink ornament, easy peasy. I die cut the word MERRY from Penny Black Love and Joy die set, also die cut in silver foil card stock. The embossed background is done with a retired SU embossing folder called "Holiday Frame", I love it for the background of this pretty ornaments.
Here is a close up of them.


And this is a picture of the finished inside of my card.

The sentiment is from Power Poppy's Poinsettia stamp set and the little ornaments are from Penny Black's A Bright Tomorrow stamp set. 
Here is the Banners that inspired my card.


Thank you for stopping by, until next time, happy stamping.
Hugs from Maria.

Pretty in Pink.....

Hello everyone: I have a card to share with you for the CASology challenge with a Cue Card PINK, here is my card.

I really wanted to emphasize the color pink so I just colored one flower from the gorgeous Power Poppy stamp set AZALEA by Marcella Howley, with my Prismacolor pencil #995 Mulberry adding a bit of white pencil to the petals for shine. I think this flower really pops off the panel but believe me, I struggled with leaving the rest of this beautiful branch colorless.
There is no sentiment, just the word stamped in Melon Mambo.
Here is a close up of this pretty pink flower.


And this is a picture of the finished inside of my card.


The sentiment and the flower in the corner are from the same set.
Here is the CASology Cue Card that inspired my card.


Thank you for stopping by, until next time, happy stamping.
Hugs from Maria.


Tuesday, April 12, 2016

Merry #200 Monday!!!!!

Hello everyone: Merry Monday  is having a big celebration this week to commemorate their 200th. challenge!! WOW!! that is simply awesome and, thanks to this fabulous challenge, I've been increasing my stash of Christmas cards to send out this Holiday Season, no more rushing to make them in time, this is the absolute best way to be stress free at Christmas time. Here is my card.


The challenge has 4 choices, I picked the sketch for my card. The image is from Penny Black Slapstick and it's called In The Manger and it couldn't be sweeter. I just love the blissful look on this little Angel's face as he is contemplating Baby Jesus sleeping.  I stamped the image onto Canson water color paper with Stazon Jet Black ink and colored it with SU markers and the aqua painter, I did add some highlights with Prismacolor pencils to the straw in the Manger, I sponged some Hello Honey and Baked Brown Sugar around. 
Here is a close up of this sweet scene.


I die cut the star with a Sizzix die set that embosses the die cut too and, to follow the sketch, I added some gold thread, I didn't want to add ribbon or card stock and I did turned the sketch on the horizontal, I hope it's ok, it needed to be this way to fit the image better.
Here is a picture of the finished inside of my card.


The sentiment is from a retired Flourishes set called "Paperwhites" and the little candle is from a set from Power Poppy called Merry Littles.
This is the banner that inspired my card, I chose the sketch.

And this is the stamp set I used for my sentiment.

Thank you for stopping by, until next time, happy stamping.
Hugs from Maria.


CAS{E} this Sketch! #167.....

Hello everybody: I have a card to share with you for the CAS{E} this Sketch! challenge #167 , I used a stamp and die set that it's so darn old I'd forgotten where it came from. I've been making cards for over 8 years now and back then when I started I just bought my stuff and never bother to save the package, I didn't write the name of the stamps, dies, papers.....I never dreamed of having a blog in those long ago days but now, I'm in dyer need to know and most times, my search for the origins of my older stamps is unsuccessful, this is the case of this particular set with the butterfly. The other set is SU Gorgeous Grunge. Here is my card and, if any of you recognize this stamps and dies, please let me know, thank you.
I stamped the SU Gorgeous Grunge images with Versamark ink and heat embossed them in gold, the sentiment word was die cut with gold foil paper using THIS die I bought for $1.99, the word is a nice size, the butterfly is stamped with Stazon Jet Black ink (because the stamp is red rubber) and colored with SU markers and the aqua painter. I added some gold gel pen to the little circles on her wings.
Here is a picture of the finished inside of my card.


The sentiment is from a retired Flourishes set called "Orchids" and the flower and small butterfly are from the same unknown set. 
Here is the banner that inspired my card.


And her is a picture of this stamp and die set, if you recognize it, I would really appreciate if you can tell me the name and company it's from.
Thank you for stopping by, until next time, happy stamping.
Hugs from Maria.


Waterlily for Retro Rubber #36.....

Hello dear friends: Well, it's time for another challenge from the fabulous Retro Rubber Challenge , this week the theme is "It's Raining" use water in your creations.....rain, rivers, ponds, lakes, the ocean, etc. so, I hope you guys give this fun challenge a try, we can't wait to see your beautiful creations in the gallery


This beautiful Waterlily is from a retired Flourishes stamp set called "Waterlily" and so are the Koi fish swimming happily around it. I stamped the images of the flower, lily pads and fish onto Canson water color paper with Versafine Onix Black ink and colored it with SU markers and the aqua painter, I added some shading and texture to the petals with Prismacolor pencils.  I did a bit of masking to place the Lily pads to look like they are under the flower, then I fussy cut all of the images to start building my little "pond". 
I used the retired SU Labels Collection dies to cut the blue card stock and also a piece of thin Vellum to make it look like water, I adhered the fish with a glue dot and put the Vellum on top with double sided tape, then I placed the flower, this hopefully gives the illusion of water with the fish "swimming" around. I added some Wink of Stella to the petals, I sure hope you can see it.
Here is a picture of the finished inside of my card.


I didn't put any sentiment on the front of the card, I really didn't want to clutter my little water scene so, I put it inside, all of this images are from the same set.

And here is a picture of the stamp set I used to create my card. This set dates back to 2012!!


Thank you so much for stopping by, I hope you join us at Retro Rubber and check out the awesome inspiration from the rest of the Designer Team. Remember to use stamps that are at least one year old and write the age of your stamp on your post. Also, please limit the number of challenges you enter to 10, including ours.
Happy Stamping, hugs from Maria.


Monday, April 11, 2016

White and Gold Christmas.....

Hello again, dear friends: I finished this card yesterday but didn't have a chance to post it so, here it is, I'm linking this card to the 52 Christmas Card Throwdown with a color challenge of White and metallic gold, the Crafty Hazelnut Christmas Challenge "Anything Goes" as long as it's Christmas and the Pixie's Crafty Workshop which asks to use our "snippets" of paper.  Here is my card.


There is just one stamped image on this card and it's on the finished inside, everything is die cut. The Jingle Bells are from Memory Box and the beautiful leaf wreath is done with my brand new and amazing Botanical Builder Framelits dies from Stampin Up!  I'm in love with this dies!!!!!
The "JOY" word is die cut with THIS Penny Black die set, really pretty fonts. I tied a bit of gold thread on each of the bells just to make them look like they are tied to the wreath.


This is a picture of the finished inside, it came out really pretty, it actually looks like another card, LOL!!

The golden Poinsettia is the only stamped image, it's from Power Poppy's Merry Littles which has a whole bunch of adorable little images.


Thank you for stopping by, until next time, happy stamping.
Hugs from Maria.


Take your Selfie.....

Hello everyone: Well, I've been having a field day making cards for the Power Poppy You Pick 3 challenge, which means you must pick only 3 markers, either at random or on purpose and color your image using them so here is another card for this fun challenge, I hope you give it a try. If you don't have any Power Poppy stamps you can still participate, you can WIN a free stamp set from Marcella, how about that for an incentive, eh?  Here is my card.


This image is from Power Poppy's 
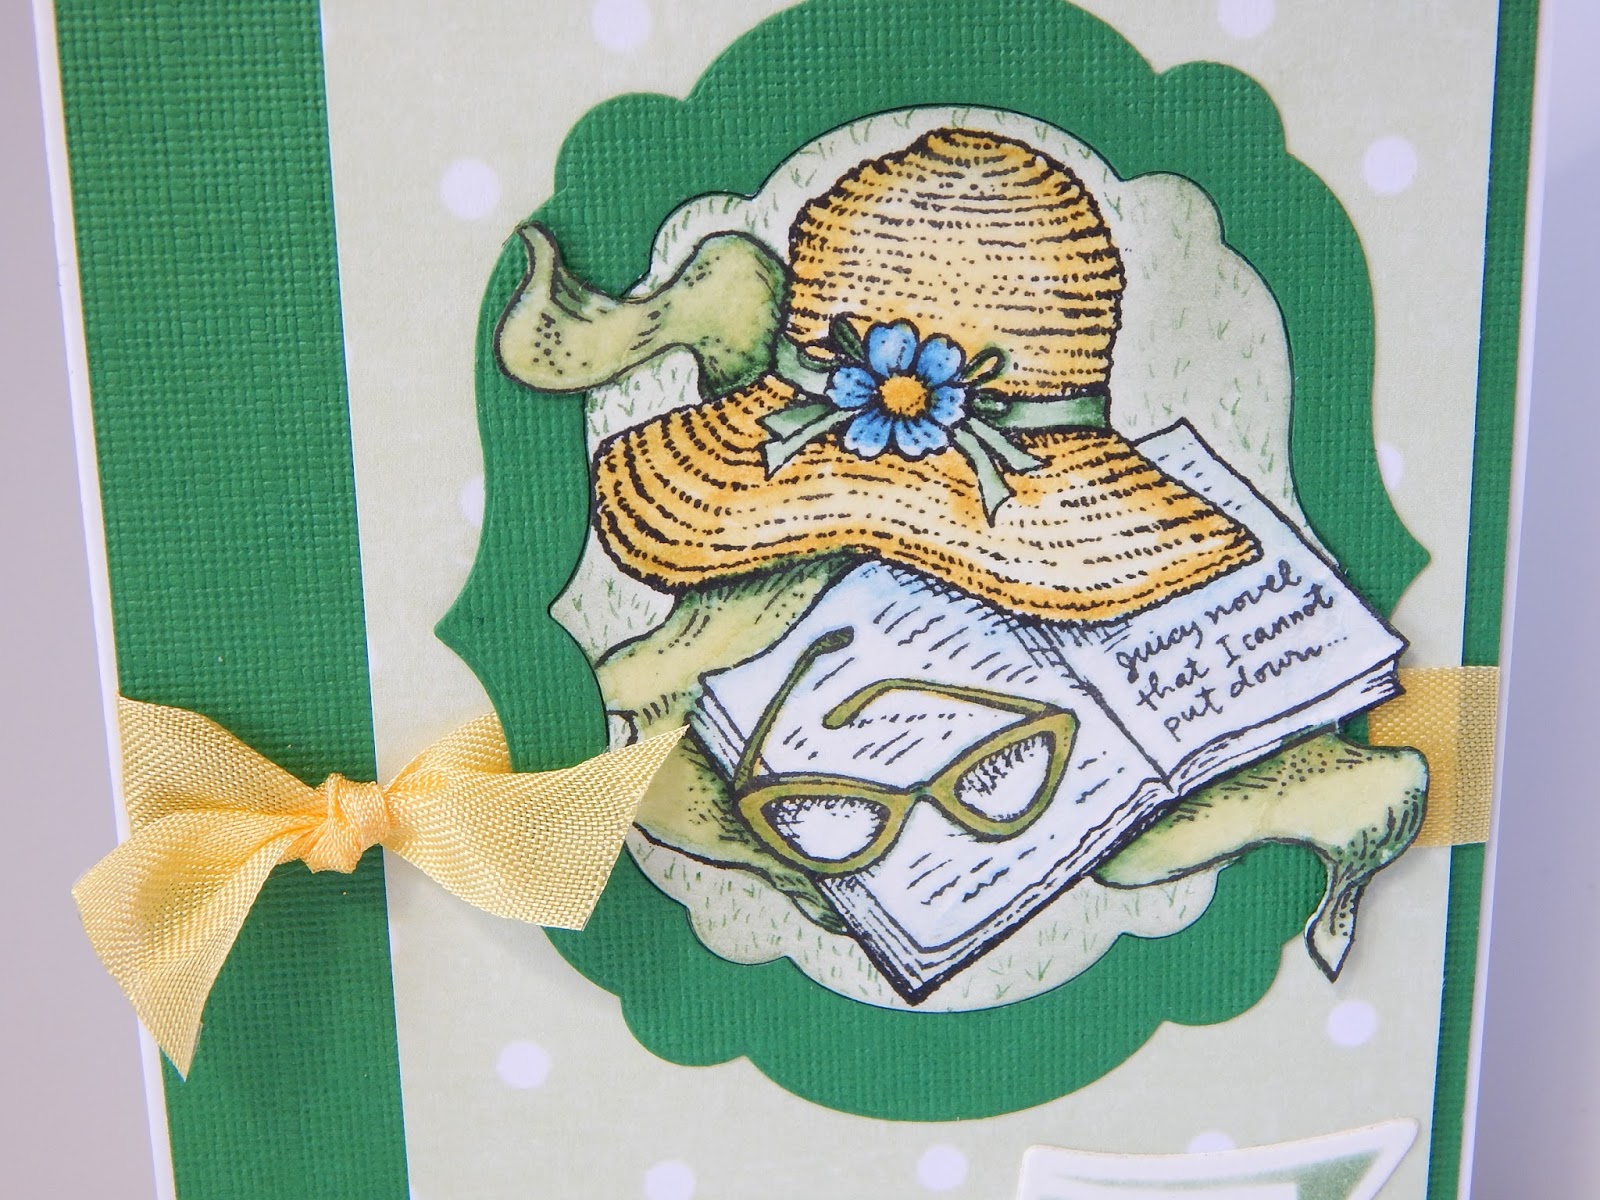
"Best Day Ever" which has super fun images of warm, sunny days at the beach or the back yard. The challenge asks to pick just 3 markers so, this time, I closed my eyes and picked Garden Green, Daffodil Delight and Soft Sky, I actually mixed the yellow and green ones to color the scarf and the glasses, just so they wouldn't just disappear into the background, the result was a very lovely color that really stands out. The image is stamped with my new favorite ink for Photopolymer stamps.....Versafine Onix Black, I love the crisp, detailed image I get the first time. You do need to allow it to dry or, if you are impatient like me, grab your heat gun.
I framed this sweet image using the retired SU labels collection dies.


This close up shows better the mixed colors of the scarf and the glasses, the pattern paper is from Lili of the Valley and the seam binding ribbon is from SU (retired) in Daffodil Delight. 
Now, about the seam binding ribbon.....I love it, it makes the prettiest bows and it's easy to tie but, it frays like crazy and I just don't like how the ends look so, as I was struggling to make this knot, an idea came to my mind.....why not put a piece of Scotch tape on the ends to prevent fraying!! so, I grabbed the tape, put a piece on one end, and cut it in an angle, then tied the knot and, before cutting I put the tape on the ribbon making sure it was placed at the same distance as in the other end and cut. 
PERFECT!! no more fraying, I just cut the sides so they wont show, since the tape is a bit wider than the ribbon and, well, there you have it. I hope this little tip will help you the next time you are using seam binding ribbon.
Ok, the sentiment is from the same set, I stamped it inside the banner from Spellbinders and sponged it with Garden Green ink.
Here is a picture of the finished inside of my card.


This sentiment is also from the set and the pretty shells are from a retired Flourishes set called "Seaside Life".
Here is another look at my card with the markers I used.

It's really amazing how an image can be colored with only 3 colors.
Here is the Power Poppy banner that inspired my card.


And here is the retired Flourishes set I used for the shells inside my card.
I just noticed that there is one shell stamp missing, it better be inside the clear stamp box!!!!! Grr!!
Thank you for stopping by, hope you give this fun challenge a try, it goes on the entire month of April so there is plenty of time for you to have some fun with it.
Until next time, happy stamping.
Hugs from Maria.


Sunday, April 10, 2016

One Layer Card.....Two Challenges.....

Hello again everyone: I have another card to share with you this morning, I'm telling you, when I get my MOJO going, I take advantage. I'm submitting this card to the "Less is More" Geometric Shapes or Patterns challenge and the CAS Mix Up April challenge, "Stamping, Stenciling + our choice", I picked the stamping with Versamark ink embossing in gold, Stenciling with an Hexagon stencil plus my choice of Sponging, here is my card.

The image is from a retired Flourishes set called "Pinwheels and Popsicles", I stamped the image onto a folded 4"x5 1/2" piece of Canson water color paper to keep the ONE LAYER requirement for the "Less is More" challenge and sponged it with some distress inks using this Hexagon stencil. The sentiment is from the set.
Here is a picture of the finished inside of my card.


Here are the banners that inspired my card.


"Less is More"
One Layer Card using Geometric Shapes or Patterns.
Thank you for stopping by, until next time, happy stamping.
Hugs from Maria.